Sediment removal fails for predictable reasons: the dewatering area is undersized, the haul route is chaotic, access is soft, and the crew spends more time handling material than removing it.
If you want a dredge project that feels professional (steady production, clean staging, predictable costs), plan it like a production line. This guide is the field-first framework we use to turn “remove muck” into a scope that actually works.
Quick answers (if you’re skimming)
- The #1 throughput limiter is dewatering. Size the receiving area first, then decide production rate.
- Measure muck thickness before you talk volume. Hotspots drive cost; dredging “everywhere” rarely makes sense.
- Limit “touches.” Every time you move sediment twice (or three times), you pay for it.
- Plan disposal early. Destination rules (wetness, contaminants, access windows) can make or break your schedule.
- Pair dredging with follow-up. Without a maintenance cadence, the basin starts drifting back immediately.
If you want the short version, the resource page is here: Sediment removal plans.
Why most sediment plans fail in the real world
On paper, it’s easy to say: “Remove muck from the lake.” In the field, the real work is handling:
- receiving wet material,
- draining it,
- staging it,
- loading it,
- and getting it to a final destination.
When that handling isn’t designed, the dredge becomes the easy part and everything else becomes stop-start logistics.
The predictable failure modes
- No defined “done.” Depth goal? Volume goal? Navigation goal? If it isn’t measurable, scope creeps.
- Access is an afterthought. Soft ground, narrow turns, or no staging pad makes every move slower.
- Dewatering is undersized. You out-produce your shoreline and the pile becomes the job.
- Disposal isn’t confirmed. “We’ll figure it out” becomes a week of re-handling.
- Vegetation blocks visibility. If the work area is a mat, you can’t see, stage, or measure cleanly.
If vegetation is the constraint, start with harvesting so dredge zones can be mapped, the shoreline is visible, and staging stays usable.
Step 1: define success like an engineer (not a wish)
Pick the “win condition” that matches your site. It usually falls into one of these:
- Depth restoration: restore usable depth in targeted zones (coves, corners, inlets, boating lanes).
- Turbidity reduction: remove the loose organic layer that keeps resuspending during wind events.
- Nutrient mass reduction: remove nutrient-rich muck that fuels algae and plant surges.
- Hydraulic capacity: improve flow-through in corridors, canals, or stormwater basins.
If you’re chasing clarity, baseline the site with water quality testing so your decisions are anchored to measurable trends (not just what the surface looks like on one day).
Step 2: measure first (depth, muck thickness, and “where it’s worth it”)
Depth restoration isn’t about dredging everywhere. It’s about targeting the zones that drive your problems:
- inlets and inflow corners that capture fines and organics,
- protected coves that stay stagnant and bloom,
- shallow shelves that become weed factories,
- pinch points that reduce corridor flow.
Field measurement methods that actually work
You don’t need a perfect survey to make smart decisions, but you do need honest data. We typically want:
- depth readings along simple transects (inlet-to-outlet, shoreline-to-center, cove-to-main basin),
- soft-layer thickness at hotspots (a marked probe/pole is enough to start),
- photos and notes tied to each hotspot (wind exposure, vegetation density, debris).
The goal isn’t to “map the entire lake.” The goal is to find the high-leverage zones where removing sediment changes outcomes.
Step 3: translate measurements into handling requirements (wet volume matters)
A common planning mistake is treating sediment as a dry material. In reality, most removed muck is a water-heavy slurry at first.
That means planning must account for:
- receiving volume (how much wet material hits the shoreline per day),
- drainage time (how quickly it consolidates),
- space (how much footprint you need to avoid a pile that blocks access),
- weather (rain turns a “pad” into a bottleneck fast).
If you only plan the dredge, your shoreline becomes the constraint.
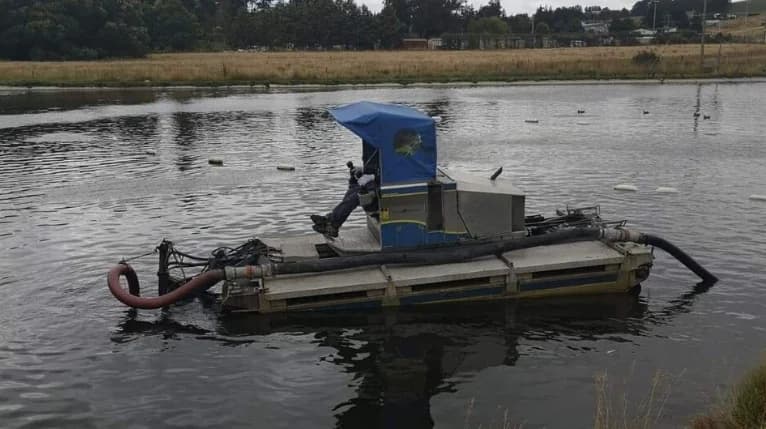
Step 4: choose the right removal approach (match method to constraints)
There are multiple ways to remove sediment. The “right” one depends on access, distance to disposal, site sensitivity, and the type of material you’re removing.
| Approach | Best for | Watch-outs |
|---|---|---|
| Amphibious mechanical dredging (cut + convey) | Soft muck, organic sediment, shallow zones, limited water depth, shoreline staging | Dewatering footprint and truck logistics must be designed |
| Hydraulic dredging (pump + pipeline) | Long-distance transport to a dedicated dewatering area, larger basins with consistent depth | Permitting, pipeline routing, and dewatering setup are everything |
| Excavation after drawdown | Small ponds that can be dewatered and accessed with conventional equipment | Disruption, shoreline damage risk, longer downtime |
Water Raptor deployments typically shine where you want controlled, shoreline-fed production and you need to keep the site accessible while material moves continuously.
See service context here: lake dredging.
Step 5: design dewatering like a throughput system (not a pile)
Dewatering is the throughput governor. Design it first.
Your shoreline needs:
- a place to receive wet material,
- a method to drain/consolidate,
- a clean path to load and haul.
Common dewatering patterns (with what they’re good at)
| Dewatering option | Good when | Trade-offs |
|---|---|---|
| Drying pad / stockpile with drainage | You have space, good access, and time to let material drain | Weather sensitivity; needs pad prep |
| Settling area / contained basin | You can control runoff and keep water in a defined footprint | Needs layout, sometimes excavation/liner, careful management |
| Geotextile tubes (geotubes) | You need contained dewatering with a smaller footprint | Requires setup/handling, discharge management, logistics |
| Direct haul (limited cases) | Material is already low-water or destination accepts wet loads | Usually higher hauling cost and higher mess factor |
If you have only one shoreline access point, add a backup plan for rain. The best plans have two dewatering zones: primary + contingency.
Step 6: traffic flow and “touches” (how projects quietly lose money)
Your plan should read like a warehouse layout:
- where material lands,
- where it drains,
- where it gets loaded,
- which direction trucks move,
- where support equipment can turn around,
- and where the machine will feed the shoreline.
Rule of thumb: fewer touches = faster work
Every extra move is a cost multiplier. Examples:
- moving a pile out of the way so trucks can load,
- restacking because the “pad” turned soft,
- relocating because dewatering is in the wrong place,
- re-collecting floating drift because cutting wasn’t contained.
If your project involves vegetation and sediment, plan the sequence so the dredge isn’t fighting visibility or floating mats. In many sites, the clean order is:
- harvest and remove biomass,
- restore depth in the hotspots,
- confirm water quality and maintenance cadence.
Step 7: disposal and reuse (decide early, confirm in writing)
A real plan defines the destination:
- Where does material go? On-site beneficial use, permitted stockpile, composting partner, landfill, etc.
- What condition must it be in? Moisture content expectations, debris tolerance, contamination screening.
- How is it transported? Truck type, route constraints, timing.
If you’re considering on-site reuse (berms, shoreline shaping, fill), plan it like a separate mini-project: grade, compaction expectations, and drainage.
Step 8: permitting, safety, and stakeholder expectations
Most sediment work touches regulated topics (wetlands, discharge, in-water work windows). Permitting is location-specific, but planning is universal:
- confirm if your work triggers a permit process,
- align schedule with any environmental windows,
- plan for turbidity controls if required,
- set expectations with neighbors/stakeholders about access and noise.
For a general overview of the U.S. CWA Section 404 permit program (often relevant for dredge/fill activities), see: https://www.epa.gov/cwa-404/permit-program-under-cwa-section-404
Step 9: what drives schedule and budget (the honest list)
If you’re trying to predict cost and timeline, focus on the drivers that actually change production:
- Access quality (firm pad vs soft bank)
- Dewatering footprint (space and drainage)
- Haul distance (and whether it’s one touch or two)
- Debris content (woody debris changes handling)
- Weather exposure (wind, rain, water level swings)
- Stakeholder constraints (work windows, traffic, public access)
The fastest projects aren’t the ones with the biggest equipment — they’re the ones with the cleanest plan.
The “before we mobilize” checklist
Use this as your pre-job scope sanity check.
- Define success (depth target / volume target / turbidity goal).
- Map 3–10 hotspots and mark access points.
- Measure muck thickness at hotspots (not just one probe).
- Choose a primary dewatering zone and a rainy-day backup.
- Confirm disposal destination and acceptance rules.
- Draft a simple traffic plan (in/out routes, staging, turns).
- Identify hazards (utilities, intakes, docks, soft shoreline areas).
- If algae is a concern, baseline with water quality testing.
If you want a deployment-ready version of this plan, start here: Sediment removal plans and book a deployment.
Common mistakes (so you can avoid them)
- Sizing the dredge before sizing dewatering.
- Treating muck like dry dirt. Wet handling changes everything.
- Ignoring vegetation and debris until day one.
- Planning one dewatering location with no fallback.
- Leaving disposal “to be decided.”
- Skipping follow-up. Without maintenance, the basin starts filling again.
References & further reading
- EPA nutrient pollution overview (useful background for “why muck fuels algae”): https://www.epa.gov/nutrientpollution
- EPA Section 404 permit program overview: https://www.epa.gov/cwa-404/permit-program-under-cwa-section-404